Sculpting Simple Shapes
Working with polymer clay is way less intimidating when you break things down into simple shapes. Whether you’re sculpting a fat little bird or a chunky dinosaur, just about every figure starts with one of these basic building blocks. Master these shapes, and you’ll feel way more confident piecing together your own creations.
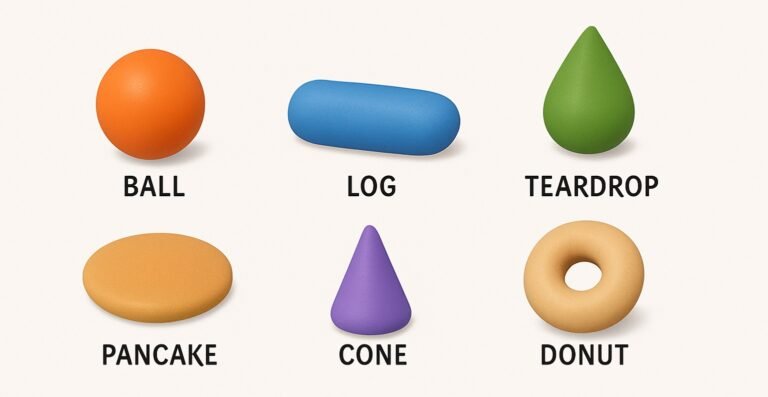
1. 🟠 The Ball
What it is: A perfect sphere.
How to make it: Roll a piece of clay between your palms in a circular motion, applying even pressure.
Why it matters: This is your go-to for heads, eyes, cheeks, paws, berries, and pretty much anything round and cute.
🔧 Tip: If your ball has cracks, your clay might be too dry. Warm it up with your hands or condition it by kneading.
2. 🟢 The Teardrop
What it is: A ball with one tapered end.
How to make it: Start with a ball, then gently roll one side to a point.
Why it matters: Great for tails, ears, leaves, beaks, or turning into petals or horns.
🔧 Tip: You can flatten the teardrop slightly for a more natural leaf or petal look.
3. 🔵 The Log
What it is: A cylinder or tube shape.
How to make it: Roll clay back and forth evenly on your work surface.
Why it matters: It’s the base for legs, arms, torsos, or anything with length.
🔧 Tip: Cut the log into equal sections if you’re making matching limbs.
4. 🟣 The Cone
What it is: A log that tapers at one end.
How to make it: Roll a log, then use your fingers to pinch or roll one end to a point.
Why it matters: Ideal for horns, tails, spikes, or gnome hats (yes please).
5. 🟤 The Pancake
What it is: A flat, round disc.
How to make it: Start with a ball and gently press it down evenly.
Why it matters: Great for faces, bellies, cookie bases, or anything flat and round.
🔧 Tip: You can texture your pancake shape for things like scales or fur patches using a toothbrush or dotting tool.
6. ⚪ The Donut
What it is: A flattened ring or “O” shape.
How to make it: Start with a ball, poke a hole in the middle, and carefully stretch the clay outward in a circle.
Why it matters: Useful for actual donuts (duh), wreaths, or accessories.
Final Thoughts
When you stop thinking about your sculpture as “a raccoon” and start thinking “balls + teardrops + logs,” suddenly everything feels way more doable. Practice these shapes until they feel second nature — then start combining them into your own adorable creatures!